Welcome Home, Little Guy


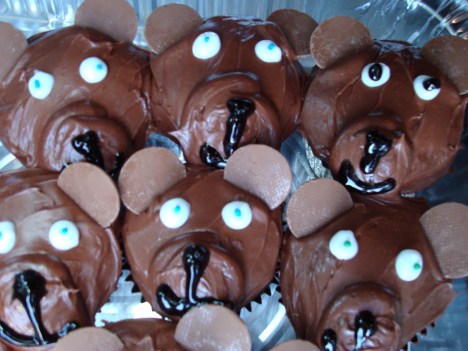
There is a brand spanking new precious cuddly cub in our family and I am unable to articulate a sentence that would accurately express my excitement and joy!  I wanted to make a special treat in honor of his coming home from the hospital.  Teddy Bear cupcakes seemed appropriate! 

I did some digging to find a trustworthy chocolate cupcake recipe and that is when I discovered that Joanne Chang, owner of the locally well-known and acclaimed Flour Bakery in Boston, had posted the recipe for her bakery’s chocolate cupcakes.  I decided to give it a try and I am so glad I did!  These cupcakes are so chocolatey and delicious and I am so thankful to Joanne for sharing! Not only are they wonderful, but the recipe is suspiciously easy.  

Flour Bakery Chocolate Cupcakes:

  • 2 ounces unsweetened chocolate
  • 1/4 cup cocoa powder
  • 1 cup sugar
  • 1 stick unsalted butter
  • 1/3 cup water
  • 1/2 cup milk
  • 1 egg
  • 1/2 teaspoon vanilla extract
  • 1 cup flour
  • 1 teaspoon baking powder
  • 1/2 teaspoon baking soda
  • 1/2 teaspoon salt

Preheat oven to 350 degrees. Chop chocolate and place it in a bowl with the cocoa powder. Mix butter, water and sugar in a pan over medium high heat. Whisk until butter is melted and sugar is dissolved, about 5 minutes. Pour hot buttervmixture over chocolate mixture and whisk until chocolate melted and ingredients are combined.  Whisk the egg, milk, and vanilla extract together then whisk into the chocolate mixture until combined.  Sift the dry ingredients together.  Pour the dry ingredients onto the wet ingredients. Whisk  until the dry ingredients are totally mixed into the chocolate mixture.  Let stand about 15 minutes. Meanwhile, line muffin tin with liners and then pour the batter (or use an ice cream scoop) into the muffin cups, dividing batter evenly among the 12 cups.  Bake in a 350 degree oven for 26-29 minutes. Cool in tin on rack for 15 minutes. 


Remove cupcakes from pan and place on rack until completely cool.  Frost with chocolate frosting (as I did) or frosting of your choice.

(Teddy Bears, pre-ears!)

I used white frosting and colored sprinkles for the eyes, black frosting for the nose and mouth, and chocolate melt candies for the ears. 

(I apologize for the fact that several of the bear’s pupils are so constricted that the bears appear to be under the influence of opiates!  These cupcakes were supposed to be kid-friendly!) 

The design of the Teddy Bear cupcakes was inspired by the cupcakes found here on Wilton’s cupcakefun.com.

Cupcake recipe courtesy of Joanne Chang, Flour Bakery.  Original recipe can be found here.

Pineapple Upside-Down Cake

 What a simple and delicious dessert! The texture of the topping is very nice and the pineapple is refreshing.  I really enjoyed this cake served warm with a scoop of vanilla bean ice cream.  I think even those who typically don’t love sweets would enjoy it.  There is something nostalgic and old-fashioned about it that makes you happy to indulge.

Pineapple Upside-Down Cake:

Topping

  • 1/2 stick butter, melted
  • 2/3 cup firmly packed light brown sugar
  • 3 cups chunked pineapple, fresh or canned

Cake

  • 1 1/2 cups flour
  • 1 1/2 teaspoons baking powder
  • 1/2 teaspoon salt
  • 1/2 teaspoon cinnamon
  • 1 stick butter, softened
  • 2/3 cup sugar
  • 2 eggs
  • 1 teaspoon vanilla
  • 3/4 cup milk

Make the Topping: In a small bowl mix the melted butter with the brown sugar and press the mixture into a buttered 9 inch round cake pan. Pat the pineapple chunks dry with paper towels and arrange them evenly over the sugar/butter mixture.

Make the Cake:  Preheat the oven to 350 degrees. Sift the flour, the baking powder, the salt, and the cinnamon into a bowl. In another bowl use an electric mixer to cream the butter with the sugar until it is light and fluffy.  Then add the eggs, one at a time, beating well after each.  Then beat in the vanilla. Add the flour mixture in three batches, alternating with the milk, beginning and ending with the flour mixture and beating well after each addition. Pour the batter into the pan over the pineapple and sugar.  Spread it evenly. 

Bake the cake for 45 to 55 minutes, or until a toothpick comes out clean.

Let the cake cool in the pan on a rack for 15 minutes.  Run a  knife around the edge of the cake and invert it onto a plate. Serve with vanilla ice cream.

Recipe courtesy of Gourmet Magazine found here on foodnetwork.com

Monkey See…

It was a certain little guy’s first birthday, so I made a cake for his monkey party guests and a mini monkey cake just for him…


…I think it’s safe to say he had fun!


Inspired by Martha Stewart’s Monkey Cake found here.

Chocolate Chip Zucchini Bread


 My brother’s lush backyard garden, which sprouted the above mammoth zucchinis, inspired me to make something with the vegetable while it is at the peak of the season.  While incorporating the zucchini into a nice fresh frittata would have been the healthy way to go, I was in the mood for baking and opted for something sweet.  I halved Paula’s recipe in order to make a single loaf, and omitted the pecans and orange zest.  Though it needed to bake much longer in my oven than Paula suggested, this was delicious!

Chocolate Chip Zucchini Bread:

  • 1.5 cups all-purpose flour
  • 1/4 teaspoon baking powder
  • 1/2 teaspoon salt
  • 1/4 teaspoon ground cinnamon
  • 1/4 teaspoon ground nutmeg
  • 1/2 teaspoon baking soda
  • 3 eggs
  • 1 cup white sugar
  • 1/2 cup vegetable oil
  • 1 teaspoon vanilla extract
  • 1 cup zucchini, grated
  • 2 cups semi-sweet chocolate chips (this was a few too many–next time I would use only 1 cup)

Preheat oven to 350 degrees.  Grease 9 x 5 inch loaf pan.  Sift together flour, salt, spices, and baking soda.

In a large bowl beat eggs until fluffy.  Add sugar and continue beating until blended.  Stir in oil, vanilla, zucchini and chocolate chips.  Stir in sifted ingredients.  Pour into greased loaf pan.

Bake for 50-65 minutes.  (Mine baked about 62 minutes.)  Remove from pan and cool.


Recipe adapted from Paula Deen’s recipe found here on foodnetwork.com

Peanut Butter and Jelly Bars


I was assigned to make a dessert for a potluck picnic, and while I love making cupcakes,  I needed something that would travel well.  These bars are delicious!  And who can resist PB&J?  I considered going “old school” by using the tradtional PB counterpart grape jelly, but instead trusted Ina’s suggestion of raspberry jam and it worked out really well.  That said, I don’t think you could go wrong by using different types of jams or jellies, seedless or with seeds.

Peanut Butter and Jelly Bars:

  • 2 sticks unsalted butter (at room temp)
  • 1 1/2 cups sugar
  • 1 teaspoon vanilla extract
  • 2 eggs, at room temperature
  • 2 cups creamy peanut butter
  • 3 cups flour
  • 1 teaspoon baking powder
  • 1 1/2 teaspoons salt
  • 1 1/2 cups raspberry jam (or any flavored jam or jelly)

Preheat the oven to 350 degrees.  

Grease and flour a 9 by 13 glass pan.

In a large bowl cream the butter and sugar using an electric mixer on medium speed until light yellow, about 2 minutes. Add the vanilla, eggs, and peanut butter and mix until all ingredients are combined.

In a small bowl, sift together the flour, baking powder, and salt. With the mixer on low speed, slowly add the flour mixture to the peanut butter mixture.

Spread and press 2/3 of the dough into the prepared pan. Spread the jam evenly over the dough. Drop small globs of the remaining dough evenly over the jam.  (This is what will give you the nice crumbly topping!)  Sprinkle with sugar.*

Cool entirely before cutting into squares.

*The recipe calls for sprinkling with coarsely chopped peanuts.  I omitted peanuts and sprinkled with sugar instead.

Recipe adapted from Ina Garten’s recipe found here on foodnetwork.com